Microsoft Clarity has rapidly gained traction as one of the most popular free behavior analytics tools for website owners and marketers.
With features like heatmaps, session recordings, and click tracking, it delivers deep user behavior insights completely free of charge.
But with great data comes great responsibility. As Clarity evolves, so do the expectations around user privacy and consent.
This step-by-step guide will walk you through everything you need to know about implementing Microsoft Clarity Consent Mode using its Consent API.
Microsoft Clarity uses cookies to enable its core behavioral analytics features. These cookies are critical for understanding how users interact with your website, helping Clarity deliver insights like session recordings, heatmaps, scroll tracking, and user navigation paths.
The behavioral data collected via these cookies includes:
- How users arrive at your site (e.g., referral source or campaign)
- Pages viewed and the order of navigation
- Time spent on each page and session duration
- Clicks, scrolls, and interaction events
- Device, browser, language preference, and approximate geographic region
Clarity does not collect personally identifiable information (PII) by default. Its system automatically anonymizes IP addresses and masks common sensitive data such as names, emails, credit cards, and passwords in recordings.
However, because the cookies used can build behavioral profiles, they are classified as non-essential under privacy laws like GDPR and UK GDPR. As a result, you must obtain explicit user consent before these cookies are set for visitors in the EEA, UK, and Switzerland.
🤔 Wondering if compliance really matters? Learn why ignoring GDPR and other privacy laws can lead to big fines.
Microsoft Clarity sets two primary first-party cookies, both of which begin with _cl as a prefix to indicate they are used by Clarity:
- _clck: This is a first-party cookie that persists the Clarity User ID and preferences, ensuring that a unique user ID is attributed to the same user on a particular site. It stores an identifier as text.
- _clsk: This is also a first-party cookie used to connect multiple page views by a user into a single Clarity session recording.It stores an identifier as text.
While this information may seem technical, it will be useful when verifying that your setup is functioning correctly after you set it up.
Introduction to Microsoft Clarity Consent Mode
Microsoft Clarity Consent Mode adjusts Microsoft Clarity’s cookie access and tracking based on a user’s explicit consent status to ensure compliance with data privacy regulations.
Starting October 31, 2025, Clarity will start enforcing these consent signal requirements for page visits originating from the EEA, UK, and Switzerland.
Now, a valid consent signal is required to ensure full functionality of Clarity features for users in these areas.
Without it, features like session recordings, funnels, and cross-page session tracking might be limited or unavailable. Non-compliance also carries significant legal risks.
Implementing robust consent management not only protects individual privacy and ensures responsible data use but also builds user trust and supports legal compliance.
ConsentV1 and ConsentV2 in Clarity: What’s the Difference?
Consent Mode for Microsoft Clarity offers two versions. Both have the same purpose to manually signal when a user has given consent for cookie tracking based on their choice using the cookie consent banner.
Microsoft Clarity ConsentV1
ConsentV1 is the first version of Clarity’s consent mode, also known as Cookie Consent API V1. It’s still currently supported but planned to be deprecated in the future.
It uses the following code to indicate when consent has been accepted:
window.clarity('consent');To withdraw consent and prevent further tracking until new consent is granted, the following code is used:
window.clarity('consent', false);For new implementations, ConsentV2 should be used directly, as ConsentV1 is scheduled for deprecation, as mentioned above.
Microsoft Clarity ConsentV2
ConsentV2, also known as Cookie Consent API V2, is the latest and recommended method for passing user cookie consent status to Clarity, and it replaces the older ConsentV1.
It offers granular control over consent types for analytics and advertising purposes. Its syntax allows you to specify the state for ad_Storage and analytics_Storage parameters as either "granted" or "denied".
window.clarity('consentv2',{
   ad_Storage: "granted | denied",
   analytics_Storage: "granted | denied"
});
If the previous ConsentV1 is used, Clarity applies the same state for both ad_Storage and analytics_Storage consent types.
Analytics_Storage
With ConsentV2, if analytics_Storage is granted, Clarity loads its tag, sets cookies, and all features function as expected.
If analytics_Storage is denied, the Clarity tag still loads, but only cookieless data is collected, and some features (like session recordings and funnels) may not work as expected because a unique ID is assigned per page view without persisting session data via cookies.
Ad_Storage
If ad_Storage is granted, Clarity shares data with Microsoft Ads.
If denied, no data is shared.
Withdrawing Consent
When a user withdraws their consent, both ConsentV1 and ConsentV2 use the same syntax to clear Clarity cookies and halt tracking until new consent is provided:
window.clarity('consent', false);In the case of ConsentV2, rejecting cookies prompts Clarity to delete existing cookies, terminate the current session, and operate in no-consent mode, where tracking continues without setting any Clarity cookies.
Check the official Microsoft Clarity Consent Mode V2 documentation if needed.
This guide will walk you through setting up Microsoft Clarity with the Cookie Consent API – ConsentV2, using Google Tag Manager (GTM) and Google Consent Mode V2.
⚠️ Prerequisite: Google Consent Mode V2 must already be implemented on your website. Clarity relies on these consent signals (analytics_Storage and ad_Storage) to know when it can and cannot use cookies.
I’m using Cookiebot (check if any discounts are currently available), a Google-certified Consent Management Platform (CMP) that takes care of everything consent related, from displaying the consent banner to managing cookie declarations and Consent Mode.
Use Cookiebot CMP to collect user consent, stay compliant with GDPR and other global regulations, and ensure proper implementation of Consent Mode. Trusted by millions, available in 47+ languages, it’s the most popular solution for balancing privacy and performance. Easy to set up, fully customizable, and Google-certified.
![Get Started with Cookiebot Today With 15% Off for 6 Months [SPECIAL OFFER]](https://ppcnewsfeed.com/wp-content/plugins/wp-fastest-cache-premium/pro/images/blank.gif)
If you’re using Cookiebot as well, you can follow my process step by step.
⚠️ UPDATE: Cookiebot has integrated Clarity Consent Mode natively in November 2025. You don’t need to setup anything in Google Tag Manager anymore. It’s all automatic.
If you’re using another CMP, keep in mind the event that tracks consent updates might have a different name in step 3. Don’t worry, I’ll remind you when we get to that part.
With the groundwork in place, let’s walk through the step-by-step setup.
To begin setting up ConsentV2 for Clarity in Google Tag Manager (GTM), the crucial first step is to disable cookies in Clarity, as they are enabled by default.
This ensures that Clarity does not set cookies automatically on a user’s browser until explicit consent is granted, which is a requirement for data privacy regulations like GDPR.
Here’s how to disable cookies in Clarity:
- Log in to your Microsoft Clarity account.
- Select your Clarity project.
- Navigate to Settings.
- Go to Setup.
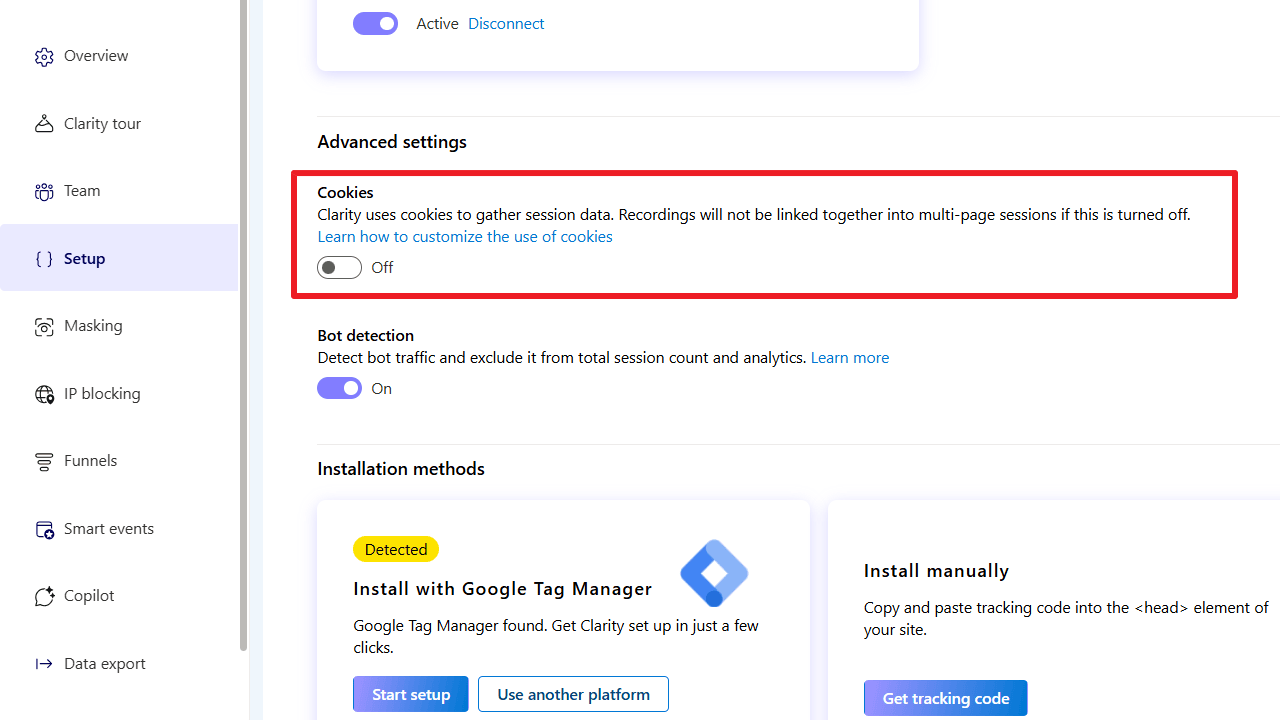
- Under Advanced settings, you will find an option for “Cookies.”
- Toggle the Cookies setting OFF to disable them.
Step 2: Add Microsoft Clarity to Google Tag Manager
The next step is to load the Clarity script through Google Tag Manager, but before you set up the tag, you’ll need your Clarity Project ID handy.
- Log in to your Microsoft Clarity dashboard.
- Open the project you want to connect.
- Look at the URL in your browser’s address bar.
- Example:
https://clarity.microsoft.com/projects/view/abc12345/ - In this case,
abc12345is your Clarity Project ID.
- Example:
Keep this ID copied. You’ll need it in just a moment.

With your Project ID ready, follow these steps in Google Tag Manager:
- Log in to Google Tag Manager and open the container for your website.
- In the left-hand menu, go to Tags > New.
- Under Tag Configuration, click anywhere in the box to open tag types.
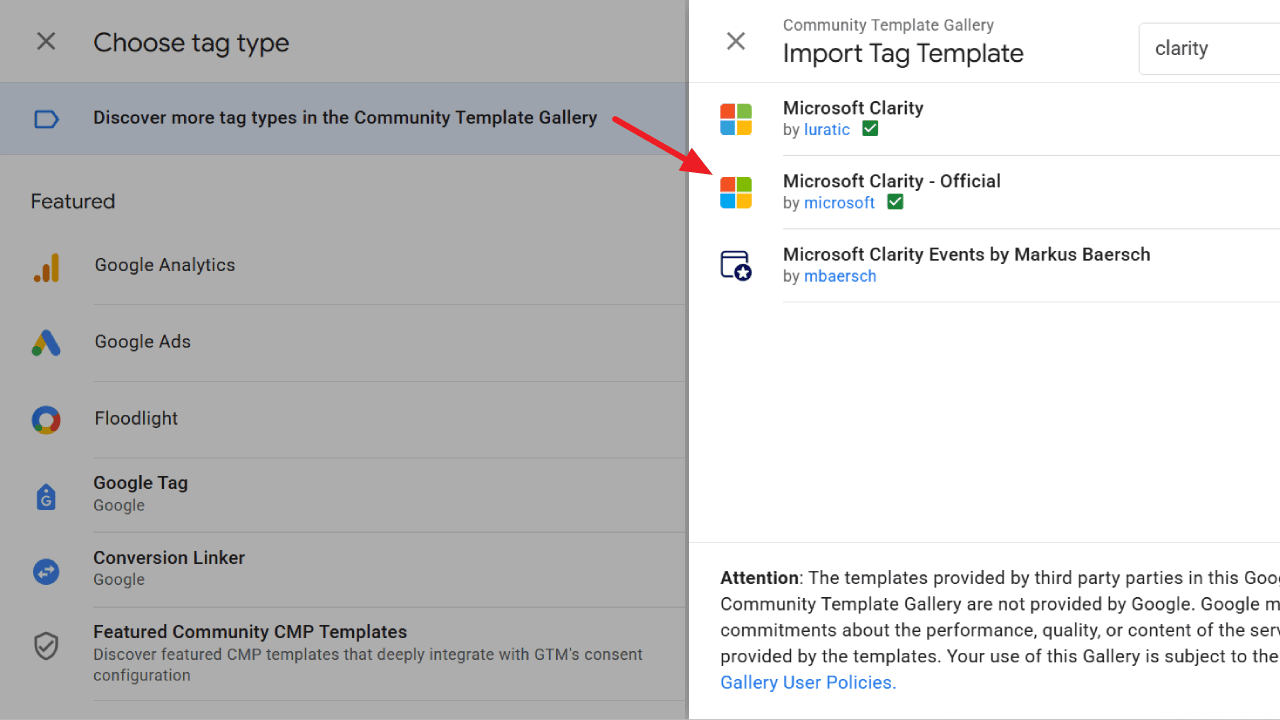
- Click Discover more tag types in the Community Template Gallery.
- Search for Microsoft Clarity and select Microsoft Clarity – Official (by Microsoft).
- Click Add to workspace to import it into your GTM container.
- Select this template and paste your Clarity Project ID in the required field.
- Name your tag something descriptive like Microsoft Clarity – Tracking.
- Under Triggering, choose All Pages. This ensures the tag only fires after consent status is processed.
- Click Save.
- Publish your container changes so Clarity can begin tracking.
At this point, your Microsoft Clarity tag is live, but it’s only running in cookieless mode. Next, we’ll enable full tracking based on user consent.

Step 3: Implement ConsentV2 for Microsoft Clarity
Now that Clarity is installed, the next step is to connect it with Google Consent Mode V2 using the Cookie Consent API – ConsentV2.
This ensures Clarity only sets cookies when users grant consent, keeping you compliant while preserving valuable data insights.
Retrieve current consent status
Before we proceed, it’s important to note that Google Consent Mode V2 must already be implemented on your website. This is a prerequisite for the steps in this section.
❓Not sure if it’s configured on your site? Here are 9 ways to verify Consent Mode v2 is enabled.
Create a variable for analytics_Storage:
- In GTM, go to Variables > User-Defined Variables > New.
- Name it: consent_analytics_storage_state.
- Choose Variable type > Custom JavaScript.
- Place the following code and save it.
function() {
  try {
    if (
      window.google_tag_data &&
      window.google_tag_data.ics &&
      typeof window.google_tag_data.ics.getConsentState === 'function'
    ) {
      return window.google_tag_data.ics.getConsentState('analytics_storage');
    } else {
      return 'unknown';
    }
  } catch (e) {
    return 'error';
  }
}
Now repeat the process for ad_Storage and name the variable consent_ad_storage_state.
function() {
  try {
    if (
      window.google_tag_data &&
      window.google_tag_data.ics &&
      typeof window.google_tag_data.ics.getConsentState === 'function'
    ) {
      return window.google_tag_data.ics.getConsentState('ad_storage');
    } else {
      return 'unknown';
    }
  } catch (e) {
    return 'error';
  }
}
The code checks Google Consent Mode for the user’s current analytics_Storage and ad_Storage settings and returns their values.
A value of 1 means consent is granted, while any other value means consent is denied.
Create a trigger to capture consent updates
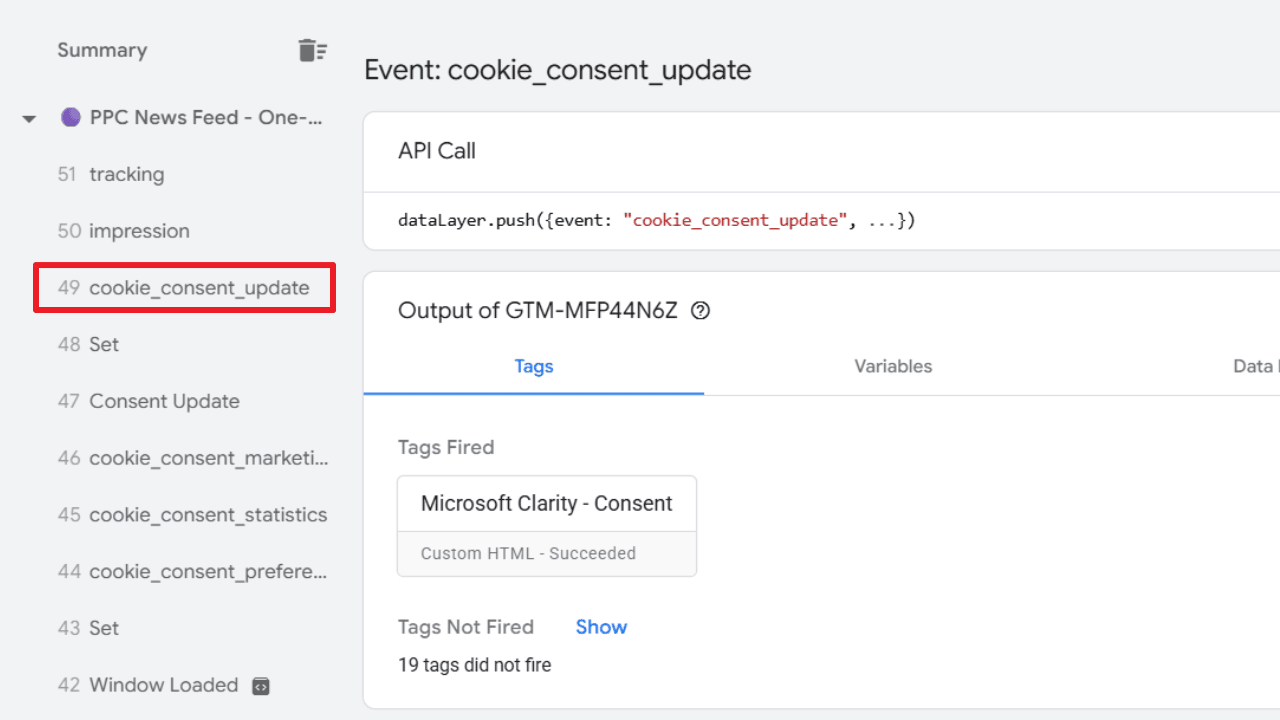
Use GTM Preview mode to identify the event automatically fired by your consent banner solution when consent is updated. If you use Cookiebot, it’s cookie_consent_update.
Once you’ve found the correct event name, follow these steps:
- In GTM, go to Triggers > New.
- Enter a name: cookie_consent_update.
- For Trigger Type, select Custom Event.
- Fill in the Event name field with your consent event. In my setup, it’s
cookie_consent_update.

Indicate consent status to Clarity
With the variables ready, you can now pass consent status to Clarity. In GTM, create a new tag and name it Microsoft Clarity – ConsentV2. Set the tag type to Custom HTML and paste in the code provided below.
<script>
  (function () {
    var analytics = {{consent_analytics_storage_state}};
    var ads = {{consent_ad_storage_state}};

    function toConsentString(v) {
      return String(v) === "1" ? "granted" : "denied";
    }

    if (typeof window.clarity !== "function") {
      window.clarity = function () {
        (window.clarity.q = window.clarity.q || []).push(arguments);
      };
    }

    window.clarity("consentv2", {
      ad_Storage: toConsentString(ads),
      analytics_Storage: toConsentString(analytics)
    });
  })();
</script>
The script maps numeric consent values retrieved for analytics_Storage and ad_Storage into granted/denied and pushes the right configuration to Clarity.
For the trigger, choose cookie_consent_update so the tag fires whenever a user’s consent preferences are updated.

Verifying Clarity Consent Implementation
After implementation, it is essential to verify that Microsoft Clarity is functioning correctly and handling cookies in accordance with the configured consent settings.
The implementation can be easily verified using Chrome Developer Tools. Follow these steps to check cookie behavior:
- Clear existing cookies for your website.
- Open developer tools in Chrome browser (Ctrl+Shift+I or Cmd+Option+I).
- Go to the Application tab and search for
_cl, which is name of Clarity cookie. - Decline cookie consent: Ensure that
_clckand_clskcookies are not set. - Grant cookie consent: Confirm that
_clckand_clskcookies are now set.
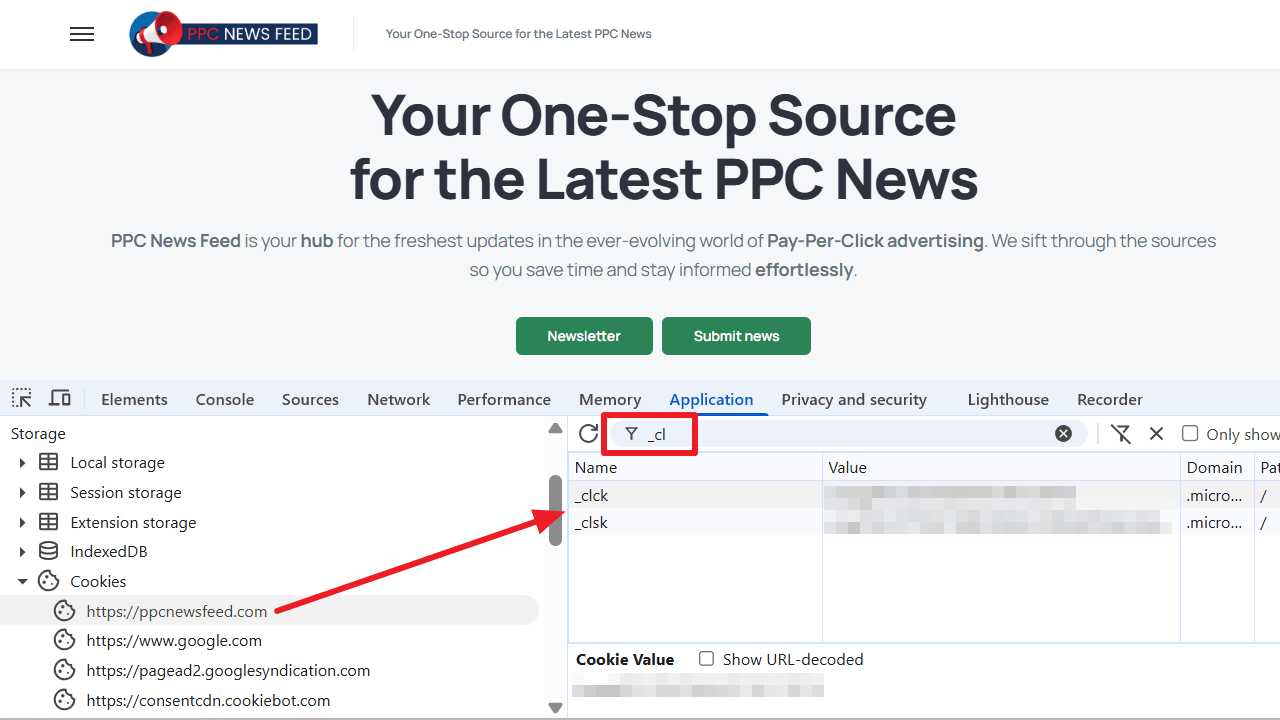
⚠️ Warning: Some CMPs may not automatically detect Microsoft Clarity cookies since they’re disabled by default. To stay compliant, review your cookie declaration and make sure Clarity cookies _clck and _clsk are included.
Final Thoughts
I hope this article has helped you understand not only why consent matters, but also how to set it up correctly using Clarity’s ConsentV2.
Getting this setup right means you’ll stay compliant, maintain trust with your audience, and still enjoy everything Clarity has to offer.